
Vegan Bento Box with Tamagoyaki
A bento box is a blank canvas into which you can pack a delicious and nutritious meal to take on the go. As the co-host of the television series Bento Expo, I've made hundreds of bentos over the years, and today I want to share some of my tricks with you so you can start packing your own vegan bento box lunches. I'm also going to be sharing some bento side dishes, as well as an eggless tamagoyaki recipe that's both vegan and vegetarian friendly.
Jump to:
What's in the Bento Box
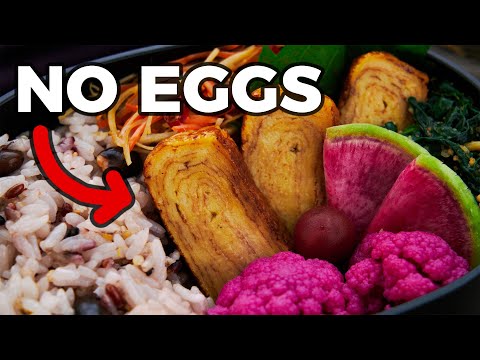
- Vegan Tamagoyaki - Bento boxes don't necessarily have to have a main dish, but the vegan Tamagoyaki would be it if I had to pick one from this box. It's also the primary source of protein and fat in this bento.
- Multigrain rice - I like to fortify the nutritional content of my rice by adding in a multigrain mix. The one I used has 16 different grains, seeds, and legumes. If you're not into rice, quinoa makes for a nutritious substitute that's packed with protein.
- Kinpira Gobo - This is a stir-fry of julienned burdock root and carrots, seasoned with a savory-sweet sauce.
- Quick pickled cauliflower - This quick pickle is made by boiling purple cauliflower florets for about a minute and a half and then draining and soaking them in seasoned sushi vinegar. You'll see the color change from indigo to magenta almost instantly due to the anthocyanin in the cauliflower reacting to the low pH of the sushi vinegar. This is a fun experiment to do with kids. You can also soak raw red onion, radishes, bell peppers, carrots, cucumber, in seasoned sushi vinegar to make a colorful variety of quick pickles that will last for weeks. Seasoned sushi vinegar can be purchased, or make it yourself by following step 7 in my sushi rice recipe. Check out the video below for more specifics.
- Goma-ae - Goma-ae means "mixed with sesame" in Japanese, and it's a delicious way to enjoy green veggies like spinach, swiss chard, kale, or green beans. By mixing the blanched vegetables with loads of ground sesame seeds and some seasonings, it creates a side dish that's creamy and nutty with loads of vitamins, fiber, and minerals.
- Watermelon radish- Watermelon radish is loaded with fiber, vitamin C and anthocyanins, and it makes for a stunning visual contrast in our vegan bento box. I've used a few slices of it as a partition to keep the tangy cauliflower pickles from making contact with the spinach (the vinegar will discolor the spinach).
- Shiso leaf - Green shiso is a Japanese herb in the mint family that's often used as a garnish in sushi restaurants. It has a wonderful fresh fragrance and attractive leaves that make it a great partition to use in bento. If you can't find it, any dark leafy green will work.

Ingredients for Vegan Tamagoyaki
- Tofu - Tofu forms the base for the vegan Tamagoyaki, and it also provides the bulk of the protein. I recommend using silken or soft tofu (the one with a custardy texture) to get the right consistency.
- Rice flour - Since tofu won't set firmly enough on its own, I add some rice flour to help it bind together into elastic layers that can be rolled. I used rice flour milled from Japanese short-grain rice, but mochi flour will also work. I do not recommend using flour milled from long-grain rice as it has a higher amylose content that will make your Tamagoyaki hard and brittle.
- Chickpea flour - Using rice flour to set the Tamagoyaki results in a chewy mochi-like texture. Using a 50:50 mixture of chickpea flour with rice flour creates a firm elastic texture closer to cooked egg. Chickpea flour also has a yellow color while contributing protein and fiber to our Tamagoyaki.
- Vegetable oil - The richness of eggs comes from the fat in the yolk. To achieve a similar mouthfeel, I've added some vegetable oil.
- Dried shiitake - Chickpea flour and tofu provide protein and substance to our Tamagoyaki, but they both have a distinct flavor that does not taste like egg. By grating dried shiitake mushroom into a powder and adding it to our Tamagoyaki mix, it helps cover up the bean-like flavor of the legumes while adding umami.
- Sweet corn powder - Sweet corn powder is made by either freeze-drying sweet corn and then grinding it into a powder or by spray-drying fresh corn juice. It has the taste and sweetness of fresh sweet corn and should not be confused with cornflour, cornmeal, or cornstarch. The corn powder adds umami and some natural sweetness so we can cut back on the added sugar.
- Sugar - Traditional Tamagoyaki has a balance of tastes between sweet and savory. The sugar helps provide this balance.
- Soy sauce - Soy sauce seasons the Tamagoyaki while lending a slightly reddish hue that shifts the color of the Tamagoyaki from yellow to golden. You can use tamari to make this gluten-free.
- Konbu cha - Konbu cha (not to be confused with kombucha, the fermented beverage) means "kelp tea" in Japanese. It comes in granules that can be added to hot water to make a savory kelp broth. This is an easy natural way to add loads of umami to any dish. If you can't find it, you can also steep whole konbu in water for a few hours to make kelp broth and then use this in place of the water.
- Salt - I used table salt for this, but black salt will give the Tamagoyaki a more egg-like flavor.
- Turmeric - This is optional, as there are other yellow ingredients in this recipe, but adding a very small amount of turmeric gives the Tamagoyaki a more vibrant yellow color. Just be careful not to add too much, or your Tamagoyaki will turn fluorescent yellow.

How to Make Vegan Tamagoyaki
In a blender or food processor (or in a beaker if you're using a hand blender), grate in the dried shiitake mushroom using a Microplane. If you use a full-size blender or food processor, you can also grind it into a powder using the machine.
Add the tofu, rice flour, chickpea flour, water, oil, corn powder, sugar, soy sauce, konbu cha, salt, turmeric, and then puree until smooth. You want the mixture to be about the viscosity of a beaten egg. If it's too thick, add a little water at a time until it reaches the right thickness.
Fold up a small piece of paper towel to form a pad and then saturate it with a few teaspoons of oil. This will be used to grease the pan between layers, put it in a bowl, and set it aside.
This Vegan Tamagoyaki mixture is very sticky, so it's crucial to use a pan with a good non-stick coating, or it will make a mess. You can use a rectangular tamagoyaki pan, or a round omelet pan will work as well (though the shape won't be quite as nice).
Preheat the pan over medium-low heat until a drop of water added sizzles. Use the oiled paper towel to wipe down every interior surface of the pan, and then add enough of the Vegan Tamagoyaki mixture to coat half of the pan. Quickly swirl the mixture around to coat the rest of the pan.
Let this fry undisturbed until the edges start to brown. I don't normally cook Tamagoyaki for so long as it will make eggs dry and tough. However, this plant-based mixture has a gooey mochi-like texture that needs to be cooked until it's just shy of burnt to firm up like egg.
Once the layer starts to brown around the edges, use an oiled spatula to roll the sheet from one side to the other. Then you want to wipe down the pan again with the oiled paper towel and add another layer of Vegan Tamagoyaki mixture.
When the next layer has started to brown around the edges, roll the first layer to the other side to wrap it in the second layer.
Now you can repeat the previous steps until your Vegan Tamagoyaki reaches its desired size. How many layers it takes will depend on the size of your pan. This full recipe makes enough batter for two small tamagoyaki or one larger tamagoyaki made in a bigger pan.
Once you're happy with the size, transfer the Tamagoyaki to a cutting board or plate and let it cool completely. It will still be soft and gummy while hot, which will make it very difficult to slice. As it cools, it should set and take on a firm texture.

How to Pack a Vegan Bento Box
The great thing about traditional Japanese bento boxes is that they don't have partitions. The relatively small size helps control portions while allowing you to use your imagination to pack your bento box how you like it. Traditional Japanese bento boxes are usually packed with rice, a protein and some vegetable side dishes, but modern bento are packed with everything from sandwiches to pasta. Here are a few guidelines to get you started.
- Pack a rainbow - It's a lot easier to keep track of macronutrients (carbs, protein, and fat) than it is to keep track of micronutrients. Since pigments in food tend to signify the presence of various micronutrients, having a variety of colors in your bento box usually means you have a good balance of nutrients. In this vegan bento box, the rice is the primary source of carbs, while the tofu and chickpea flour in the Tamagoyaki deliver the protein. The fat comes from vegetable oil used in the various dishes. The various yellow components of the Tamagoyaki and the carrots in the kinpira provide tons of carotenoids. The watermelon radish and purple cauliflower are loaded with anthocyanins, and the spinach is rich in Lutein, Folate, and Vitamin K. I always like to to have the fridge stocked with a colorful assortment of bite-sized fruits and veggies such as berries, grapes, cherry tomatoes, and snap peas to add a pop of color to my bento.
- Pack it tight - Since a bento box is meant to be taken on the go, the contents need to be secure, so they don't shift around in transit. That's why it's important to use a relatively small container and pack it with very little room for the contents to shift around. I usually do this by picking an orientation for the box and packing it in layers from back to front. If it helps, you can sketch where you plan to put your various side dishes. I like to mentally divide the box into triangles, making for a more exciting presentation than lining everything up in rows.
- Use separators - Some foods go together, but others will not, so it's helpful to have edible partitions like lettuce, kale, cabbage, etc., to place between various foods. This helps keep the flavors separate and provides a nice visual contrast while adding even more nutrients. If the food you want to pack is very wet, I generally don't recommend packing it into a bento as the high moisture content will make it spoil quickly, and it will make the foods around it soggy.
- Meal prep - One way I reduce the amount of work to do in the morning is to make extra portions of side dishes that can be packed into your bento box for the next day. This could be anything from boiled broccoli to a pasta salad. I also like to meal prep sides that will last for a few days like the Kinpira Gobo or Quick Pickles used in this vegan bento box. Keeping your pantry stocked with healthy snacks such as dried cranberries or walnuts is another easy way to add an extra item to your bento without doing any cooking.
Other Vegan Bento Box Ideas
- Tofu Karaage
- Tofu Steak
- Takikomi Gohan (Japanese mushroom rice)
- Vegan Unagi
- Vegetable Gyoza
- Daigaku Imo (glazed sweet potato)
- Japanese Pickles 3-ways
- Marinated Mushrooms
📖 Recipe

Equipment


Units
Ingredients
- 1 gram dried shiitake (½ small mushroom)
- 170 grams silken tofu
- 35 grams short grain rice flour (~¼ cup)
- 28 grams chickpea flour (~¼ cup)
- ¾ cup water
- 1 tablespoon vegetable oil (plus more for cooking)
- 4 grams sweet corn powder (~1 tablespoon)
- 2 teaspoons evaporated cane sugar
- 1 teaspoon soy sauce
- ½ teaspoon konbu cha
- ¼ teaspoon salt
- 1/16 teaspoon turmeric (optional)
- vegetable oil (for wiping the pan)
Instructions
- Use a Microplane or clean spice grinder to grind the 1 gram dried shiitake into a powder.

- Add the shiitake mushroom powder, 170 grams silken tofu, 35 grams short grain rice flour, 28 grams chickpea flour, ¾ cup water, 1 tablespoon vegetable oil, 4 grams sweet corn powder, 2 teaspoons evaporated cane sugar, 1 teaspoon soy sauce, ½ teaspoon konbu cha, ¼ teaspoon salt, and 1/16 teaspoon turmeric into a blender, food processor, or beaker. Puree the mixture until smooth. It should have the consistency of a beaten egg. If the mixture is too thick, add water a little at a time until it's the right viscosity.
- Add a few teaspoons of vegetable oil to a small bowl. Fold up a quarter of a paper towel into a small pad, and soak it in the bowl of oil.
- Heat a non-stick tamagoyaki pan or an omelet pan over medium-low heat until hot. Use the oil-soaked paper towel to wipe every interior surface of the pan.
- Pour enough of the tamagoyaki mixture into the center of the pan to coat about half of the pan, and then quickly swirl it around the pan to create a thin, even layer.
- Let this cook undisturbed until the edges of the sheet start to brown. The mixture is gooey when lightly cooked, so it is essential to thoroughly brown each layer to give it the right texture. Use an oiled spatula to roll the sheet up to one side of the pan.
- Wipe the pan down again with the oiled paper towel and then add some tamagoyaki mixture and swirl it around to coat the pan.
- When the edges start to brown, roll the Tamagoyaki beginning from the side with the previous roll.
- Repeat the last two steps until you Tamagoyaki is the desired size. Next, transfer the tamagoyaki to a plate or cutting board and let it cool completely before cutting it.


Nutrition Facts
FAQ
Bento (弁当) is the Japanese word for any meal that's packed into a lunch box so it can be eaten on the go. Obento bako (お弁当箱), or bento box, is a container with a lid that a bento is packed inside. They come in various shapes and sizes and are made with materials ranging from wood to plastic to metal. These can be divided into two major categories: traditional and non-traditional. Non-traditional bento boxes, which are popular outside of Japan, tend to be relatively large and flat and have compartments to hold different types of food. On the other hand, traditional Japanese bento boxes tend to be smaller and deeper with no physical partitions. This makes them compact and easy to carry while making it easy to control portion size.
Tamagoyaki literally means "pan-fried egg" in Japanese, and it generally refers to a rolled omelet. For this vegan Tamagoyaki, I've replaced the egg with tofu, rice flour, and chickpea flour and seasoned the mixture with umami-rich ingredients like soy sauce, sweet corn powder, shiitake mushrooms, and konbu cha.
The bento box is just a container, so it will depend on what you pack into it, but as long as you are using a traditional Japanese bento box, it should be pretty small, putting a physical limit on your portion size.
Jax says
Thank you. Missed this since going vegan. May I ask, how long do you pickle the cauliflower for?
Marc Matsumoto says
A day should be enough but once they're pickled they'll last for around 2 weeks.